Просмотр новости
Найдите то, что Вас интересует
 Спутники
 РН
РН SpaceX
 Роскосмос
 NASA
NASA
СпутникиРНSpaceXРоскосмосNASA
When Fender launched the Twin Reverb in 1963, the music world was blessed with a high-powered, reverb and vibrato-equipped tube amplifier that would become a staple for performing bands. The tweed Twin amps of the decade prior featured totally different circuitry, with lower output power and more grit than we hear from the crystal-clear Twin Reverbs of the ’60s and ’70s. After 1963, spotting a Fender Twin Reverb in a band’s backline became commonplace.On the bench today we have a 1965 Fender Twin Reverb. The amp was brought to me by a client who described this one as his “daily driver.” This is the case for many musicians who don’t mind lugging around the 65-pound combo. The Twin Reverb’s power and clarity makes it a perfect pedal platform, and its durability makes it the perfect workhorse amplifier.The main complaint was noise issues, including very scratchy controls. Once I removed the chassis, I was thrilled to see that the amp was almost totally original! The fact that this amp has been heavily used with its 60-year-old parts is a testament to the quality of the components and the circuit design. The filter capacitors were beginning to bulge and leak, so the owner and I decided it was time to give the amp a solid refurbishing to promote stability for future decades of use.Each technician has their own method of refurbishing a Fender amplifier. Determining how far to go with a restoration is a delicate dance between reliability and originality. I want to repair the issues at hand, while also addressing the parts of the circuit that are prone to issues. In many cases, the bulk of the restoration focuses on the power supply and power amplifier. These sections of the circuit are handling a lot of power and high voltages, and over time they just wear out. Oftentimes, the tone-shaping components in the preamp are able to stay original.Once I replaced the filter capacitors with high quality F&Ts, I moved on to the cathode bypass capacitors. These caps were also beginning to show signs of weakness, and I typically find myself replacing these in most of my Fender restorations. The last capacitor that I like to replace is the bias capacitor, which is in charge of filtering the negative bias voltage for the output tubes.In most amps and many other consumer electronics made before the ’70s, the resistors used are called carbon composition resistors. These are small brown resistors that are made out of finely ground carbon, and mixed with a non-conductive binder. When serving as a preamp plate resistor, these small components have an important job. The plate resistors are connected to the power supply, and feed high voltage to the preamp tube plates. Once the signal is amplified through the preamp tube, that signal exits the tube through the tube’s plate and onto the rest of the circuit. In short, these preamp plate resistors see both high voltage DC and the AC guitar signal. Over time, it is common for the internals of the resistor to break down, which can impart some very noticeable popping and crackling into the signal path.The last step is to address the vibrato effect. The funny thing is, Fender used the term vibrato but the effect is actually tremolo. In my initial testing of the amp, I noticed that while the effect was functioning, it was a bit weak overall. This is typically due to the oscillator capacitors drifting from spec over time, which can weaken the depth of the volume fluctuation. In this case, replacing the three oscillator capacitors helped get that “vibrato” stronger.After a deep cleaning of all the pots, jacks, and tube sockets, I ran the amp to listen for any other miscellaneous issues. Many of the tubes in this amp are a variety of vintage tubes, and they passed testing with no noise, excessive microphonics, or overheating issues. Modern tubes are great, and we’re so lucky to have access to them. But I’m always excited to be able to leave in the old tubes, as the quality of manufacturing from decades prior and the mystical “mojo” of the old glass bottles tends to be desired.The last step in a large refurbish job like this is to play through the amp for a while. I will wiggle the reverb RCA cables to make sure there is no cut-out, test the footswitch, and poke around to make sure I didn’t miss any poor connections or weakened solder points. The Twin Reverb truly lives up to its reputation. It is loud and proud, full-bodied and crystal clear.
When Fender launched the Twin Reverb in 1963, the music world was blessed with a high-powered, reverb and vibrato-equipped tube amplifier that would become a staple for performing bands. The tweed Twin amps of the decade prior featured totally different circuitry, with lower output power and more grit than we hear from the crystal-clear Twin Reverbs of the ’60s and ’70s. After 1963, spotting a Fender Twin Reverb in a band’s backline became commonplace.
On the bench today we have a 1965 Fender Twin Reverb. The amp was brought to me by a client who described this one as his “daily driver.” This is the case for many musicians who don’t mind lugging around the 65-pound combo. The Twin Reverb’s power and clarity makes it a perfect pedal platform, and its durability makes it the perfect workhorse amplifier.
The main complaint was noise issues, including very scratchy controls. Once I removed the chassis, I was thrilled to see that the amp was almost totally original! The fact that this amp has been heavily used with its 60-year-old parts is a testament to the quality of the components and the circuit design. The filter capacitors were beginning to bulge and leak, so the owner and I decided it was time to give the amp a solid refurbishing to promote stability for future decades of use.
Each technician has their own method of refurbishing a Fender amplifier. Determining how far to go with a restoration is a delicate dance between reliability and originality. I want to repair the issues at hand, while also addressing the parts of the circuit that are prone to issues. In many cases, the bulk of the restoration focuses on the power supply and power amplifier. These sections of the circuit are handling a lot of power and high voltages, and over time they just wear out. Oftentimes, the tone-shaping components in the preamp are able to stay original.
Once I replaced the filter capacitors with high quality F&Ts, I moved on to the cathode bypass capacitors. These caps were also beginning to show signs of weakness, and I typically find myself replacing these in most of my Fender restorations. The last capacitor that I like to replace is the bias capacitor, which is in charge of filtering the negative bias voltage for the output tubes.
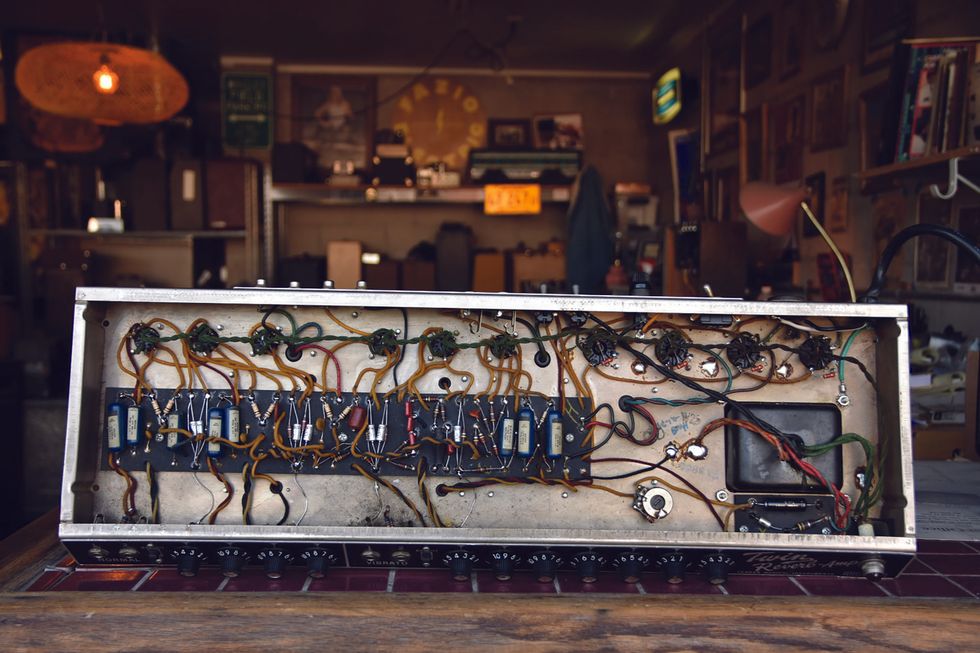
In most amps and many other consumer electronics made before the ’70s, the resistors used are called carbon composition resistors. These are small brown resistors that are made out of finely ground carbon, and mixed with a non-conductive binder. When serving as a preamp plate resistor, these small components have an important job. The plate resistors are connected to the power supply, and feed high voltage to the preamp tube plates. Once the signal is amplified through the preamp tube, that signal exits the tube through the tube’s plate and onto the rest of the circuit. In short, these preamp plate resistors see both high voltage DC and the AC guitar signal. Over time, it is common for the internals of the resistor to break down, which can impart some very noticeable popping and crackling into the signal path.
The last step is to address the vibrato effect. The funny thing is, Fender used the term vibrato but the effect is actually tremolo. In my initial testing of the amp, I noticed that while the effect was functioning, it was a bit weak overall. This is typically due to the oscillator capacitors drifting from spec over time, which can weaken the depth of the volume fluctuation. In this case, replacing the three oscillator capacitors helped get that “vibrato” stronger.
After a deep cleaning of all the pots, jacks, and tube sockets, I ran the amp to listen for any other miscellaneous issues. Many of the tubes in this amp are a variety of vintage tubes, and they passed testing with no noise, excessive microphonics, or overheating issues. Modern tubes are great, and we’re so lucky to have access to them. But I’m always excited to be able to leave in the old tubes, as the quality of manufacturing from decades prior and the mystical “mojo” of the old glass bottles tends to be desired.
The last step in a large refurbish job like this is to play through the amp for a while. I will wiggle the reverb RCA cables to make sure there is no cut-out, test the footswitch, and poke around to make sure I didn’t miss any poor connections or weakened solder points. The Twin Reverb truly lives up to its reputation. It is loud and proud, full-bodied and crystal clear.
| # | Наименование новости | Тональность | Информативность | Дата публикации |
|---|---|---|---|---|
| 1 | Tonewood Teardown: Upgrading Our Harley Benton Guitar’s Tuners | 0 | 7.03 | 07-08-2026 |
| 2 | This Small Amp Sounds HUGE | 0 | 17.98 | 11-08-2026 |
| 3 | On Bass: Are You Playing With Your Ears or Your Eyes? | 0 | 6.3 | 15-08-2026 |
| 4 | Rig Rundown: Tyler Armstrong (The Band Feel) | 0 | 6.96 | 04-03-2026 |
| 5 | Esoterica Electrica: What a Neck Joint Says About Your Guitar | 0 | 8.06 | 13-08-2026 |
| 6 | FU-Tone’s Mass Appeal | 0 | 8.06 | 01-05-2026 |
| 7 | Tokai Hard Puncher Review | 0 | 10.61 | 14-08-2026 |
| 8 | Fix the Tiny Gremlins Stealing Your Guitar’s Tone | 0 | 9.78 | 02-03-2026 |
| 9 | Floyd Rose Unveils Limited Edition Etched Paisley USA Series Tremolo | 0 | 12.6 | 10-08-2026 |
| 10 | A Guitar With a 20-Watt Speaker Built In? | Inspire Pro Demo | 0 | 7.67 | 17-08-2026 |